A Course as Varied as the Game Itself
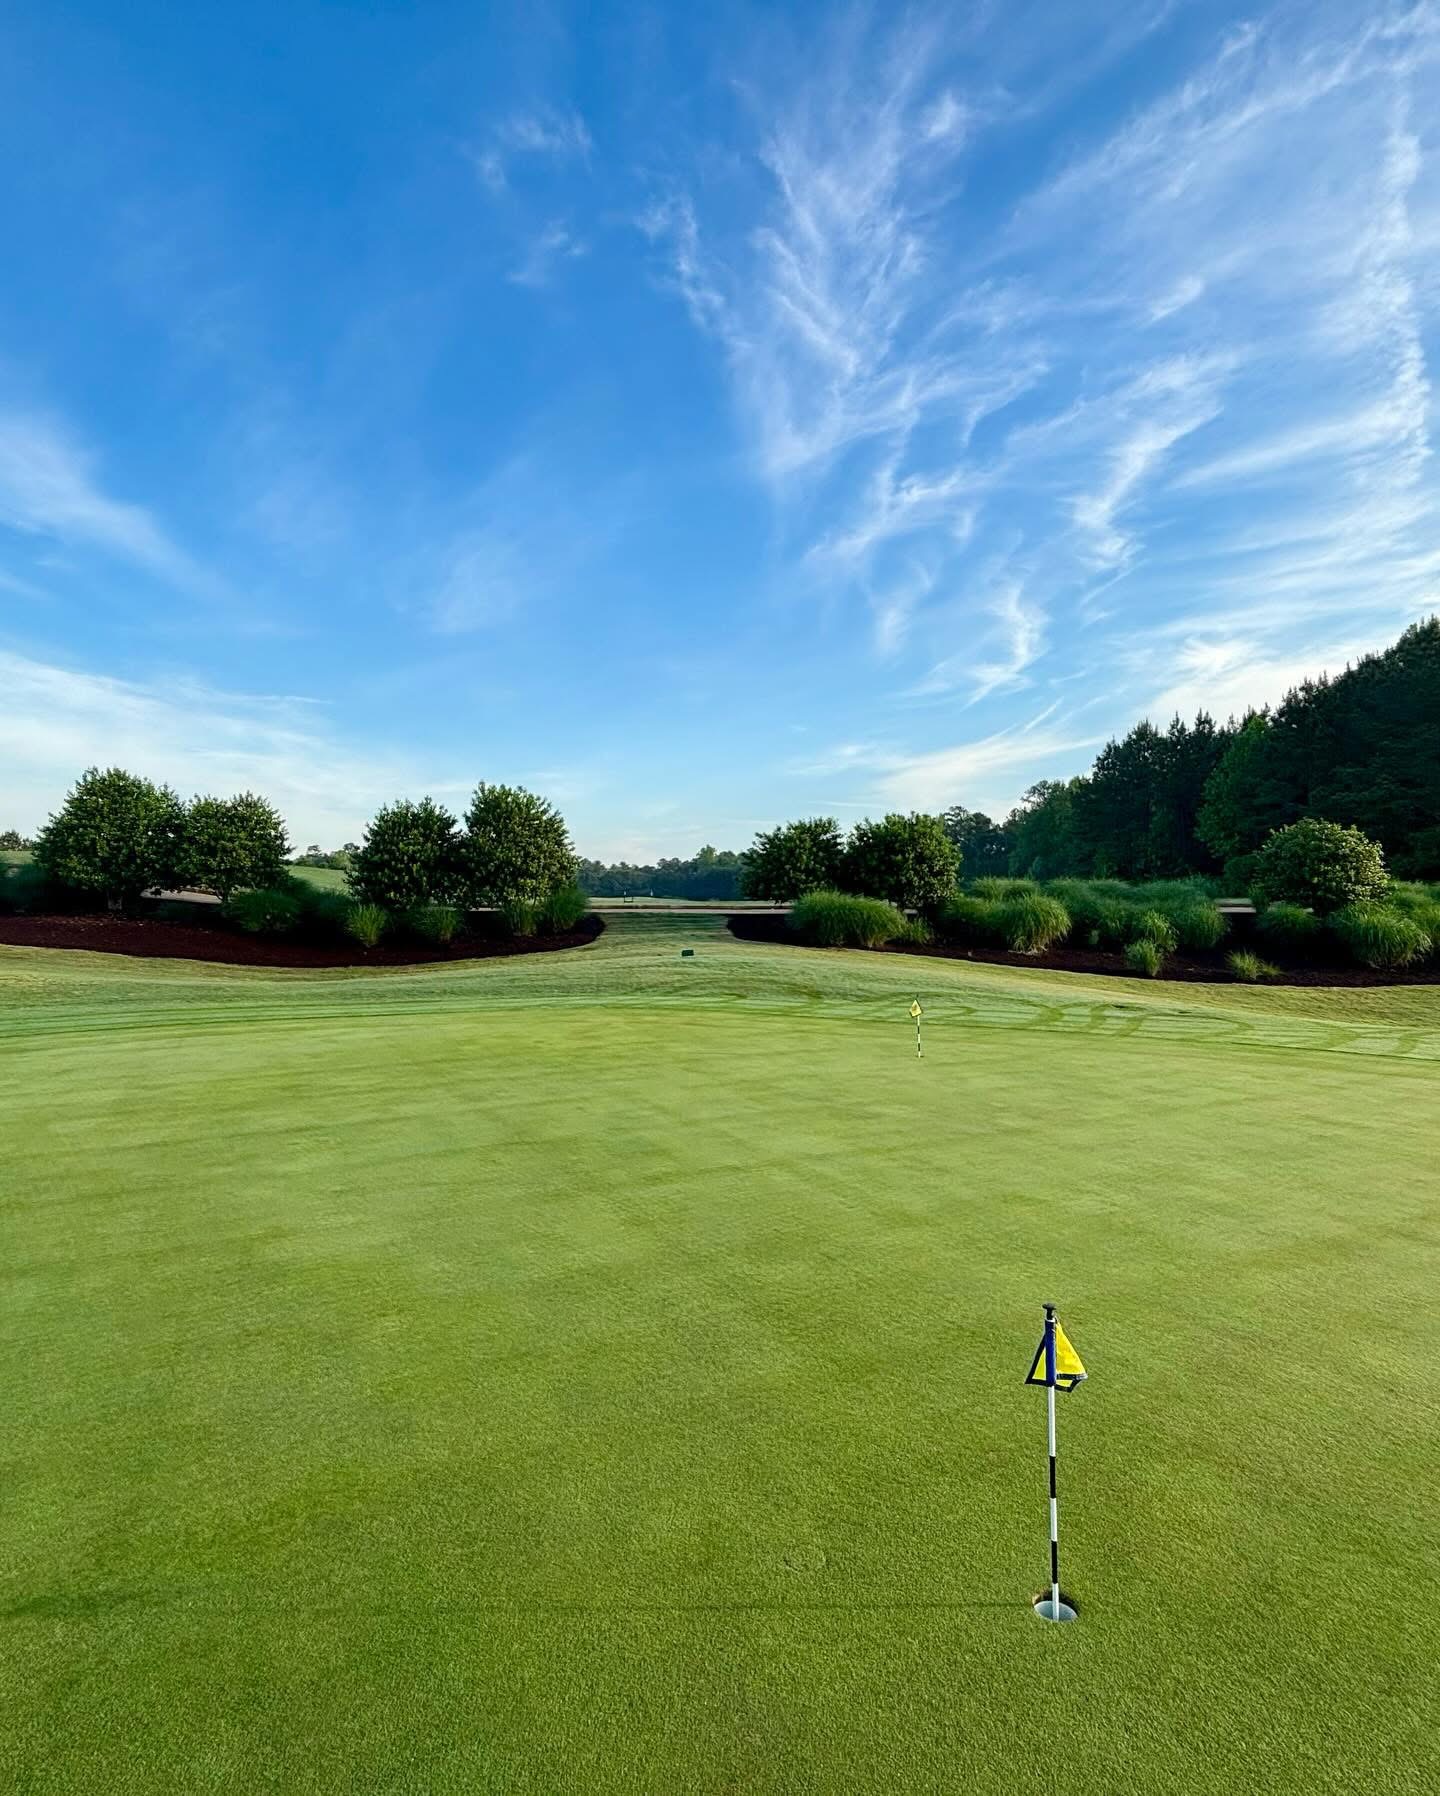
Brickshire Golf Club offers a dynamic and rewarding experience for golfers of every skill level, with six sets of tees stretching from a welcoming 4,892 yards to a championship-caliber 7,291. Designed to test every club in your bag, the layout features uphill and downhill shots, uneven lies, wetlands, and water hazards—ensuring no two holes ever feel the same.
Yardages are clearly marked throughout the course with 100, 150, and 200-yard monuments, 150-yard posts, cart path markers, and sprinkler heads. Wide, generally forgiving fairways lead to fast, bentgrass greens—though several fairways feature strategic tilts, making our black-and-white aiming posts an important guide.
Architect Tom Clark, with input from two-time U.S. Open Champion Curtis Strange, designed 14 original holes and four emulation holes that pay tribute to some of golf’s greatest. Combined, they offer a round that’s both familiar and fresh—one that rewards thoughtful play and delivers a true test of skill.
HOLE 1
Hidden Grove (Emulation of Augusta National #3 “Flowering Peach”)
Don’t let the short yardage fool you—this par 4 demands precision from the start. Inspired by Augusta’s iconic third, “Flowering Peach,” our opener invites a bold tee shot that must thread the needle between challenge and opportunity. A sculpted bunker complex hugs the left side of the fairway, forcing many players to favor the right—but that angle brings a steeper price. From there, your approach into a left-tilting green is anything but simple. Pick your risk, trust your shot, and welcome to Brickshire.

HOLE 2
Subtle Climb
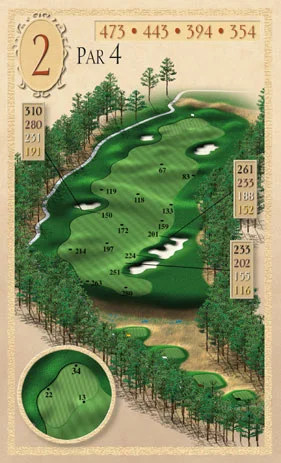
Don’t let the clean sightlines fool you—this lengthy par 4 is all climb and calculation. The fairway rises steadily toward a perched green, putting both distance and elevation into play from the first swing.
While many can fly the right-side bunkers, the left trap is sneakier than it looks and sits squarely in play off the tee. The fairway tilts subtly, and finding the center gives you the best chance to hold your footing for the second shot. From there, the uphill approach plays longer than the number—club up and commit, because anything short leaves a challenging recovery.
HOLE 3
The Gauntlet
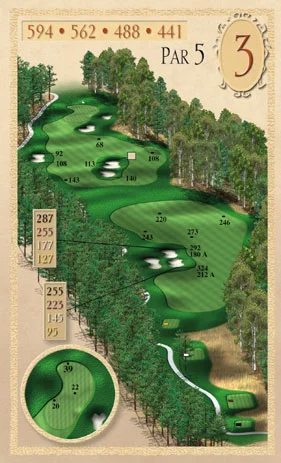
A true thrill ride, this par 5 is as fun as it is unforgiving. Big hitters can reach it in two, but risk and reward dance close together here. From the elevated tee, avoid the bunker complex guarding the left side—though even a well-placed shot will find the fairway tilting right beyond it.
The second shot demands a decision: lay up safely, or thread the fairway split by deep bunkers to chase eagle dreams. Either way, the approach to the green is uphill and deceptive. Miss right, and recovery becomes a scramble. The green itself has a sneaky tilt toward the back right, making birdies feel earned—and doubles feel personal.
HOLE 4
Whispering Rise
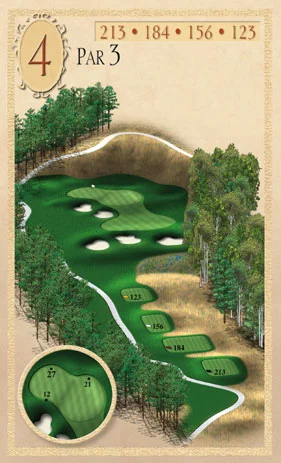
Don’t let the yardage fool you—this par 3 plays uphill and packs a punch. A clean strike is essential to clear the string of bunkers guarding the green like sentinels. Come up short, and you’re in for a sandy scramble.
It’s all about placement here. An extra club is usually the play, especially with the green sloping back-to-front. Land below the hole if you can—putts from above tend to get… adventurous.
HOLE 5
Turning Point
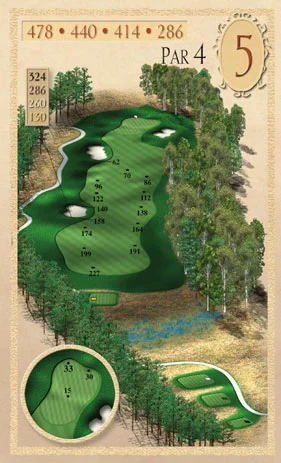
One of our most difficult holes earns its reputation. This demanding par 4 calls for both accuracy and restraint from the tee. The fairway sweeps steadily to the right, following the natural contour of the land—spelling trouble for players with a fade or slice. Play smart and favor the left center to hold your line.
The challenge doesn’t end there. The approach must be carefully judged—this green punishes anyone left above the hole. A downhill putt here is a test of nerve, speed, and touch. Stay below the pin, and you’ve already passed the first exam.
HOLE 6
The Gamble
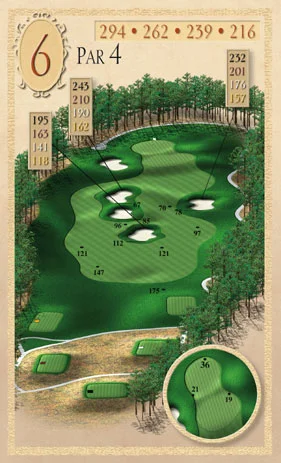
Tucked into the trees like a secret, this short par 4 plays with your head as much as your swing. From the tee, it looks wide—inviting, even. But beneath its calm surface lies a carefully guarded challenge.
The fairway flows into a layered bunker complex that protects all but the most perfectly placed approach. And the green? Quiet, elevated, and full of movement—miss your tier, and you’re in three-putt territory before you realize what went wrong. It’s not just about power here. It’s about touch, trust, and tuning in to what the course isn’t saying out loud.
HOLE 7
Ross’s Echo (Emulation of Pinehurst #11 “Sleeper”)
Emulating the legendary 11th at Pinehurst No. 2, this par 4 is a tribute to the genius of Donald Ross—where precision always trumps power. Though generous off the tee, don’t let the width lull you into comfort. It’s the green that makes this hole sing—and sting.
A well-protected complex awaits, with subtle contours and a raised back tier that turns birdie hopes into scrambling par saves. Approach shots that land short may stay safe, but anything long or offline risks a fast trip back down the slopes. Pick your angle wisely—this one’s all about the finish.

HOLE 8
Split Decision
The final par 3 on the front may be the flattest, but don’t be deceived by its uniformity. Tee selection sets up two very different challenges: from the forward tees, you’ll face a deep, narrow green that rewards pinpoint accuracy, while the back tees open up to a wider, shallower target—demanding a softer touch.
No matter your choice, getting close is key. Miss your mark, and three-putts become all too common. Master this dual-natured hole to cap off your round on a high note.

HOLE 9
Half Acre’s Revenge (Emulation of St. Andrews #14 “Long”)
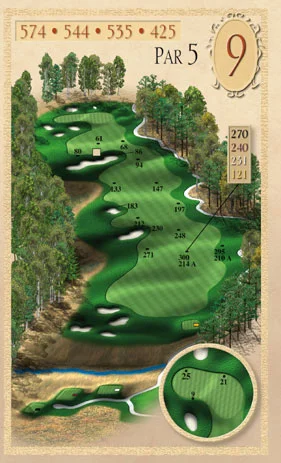
This sweeping par 5—Brickshire’s tribute to the 14th at St. Andrews—blends strategy, elevation, and subtle cruelty into one unforgettable finish to the front nine.
But it’s the bunkers that give this hole its name. Tucked away and ready to punish, they’ve earned this stretch its infamous nickname. The green is wide but shallow, making your third shot your most important. Float it in soft—or pay the price.
HOLE 10
Tilted Truth
Kicking off the inward nine is a visually striking par 4 with a distinct lean to the left. The fairway angles and contours tempt you to shape your shot with the slope—but beware: this hole rewards precision, not persuasion.
The green is perched and well-defended. Miss left, and your ball may never be seen again. Miss right, and you’re likely facing a difficult up-and-down from unfriendly terrain. A well-placed tee shot sets up a manageable approach—but anything less, and the beauty of this hole quickly becomes its bite.

HOLE 11
Siren’s Call (Emulation of Riviera # 10 “Risk Reward”)
A tribute to Riviera’s iconic 10th, this short par 4 lures players with the promise of an easy score—but only if they can resist its deception. The fairway looks generous, but angles are everything. Play too bold, and you’ll find bunkers that punish ego over execution. Play too safe, and your second shot turns awkward fast.
A well-placed iron off the tee leaves a soft approach into a narrow, well-defended green. Par is absolutely within reach—so long as you don’t get greedy. This is the kind of hole that whispers possibilities… and punishes missteps.

HOLE 12
Iron Will
The longest hole on the course—and it plays every inch of it. This true three-shot par 5 demands power, precision, and focus from the first swing to the final putt.
The right side is lined with relentless trouble, marked by a lateral hazard that punishes even a slight miss. Your second shot must be well-placed to avoid squeezing yourself out of a clean approach, and even then, the challenge isn’t over. The large, hump-backed green repels careless landings and makes two-putting far from guaranteed. Par here isn’t just good—it’s earned.

HOLE 13
No Fly Zone
From the tee, it looks manageable—but looks are the only easy thing about this par 3. Most players under-club and come up short, caught by the slope or snatched by one of the unforgiving front bunkers.
The green is wide but shallow, demanding pinpoint accuracy and proper elevation. Play it bold, trust your number, and don’t let ego steal your club choice—because the traps in front have hands like Jerry Rice, and they’re not dropping much.

HOLE 14
Deal ‘Em Straight
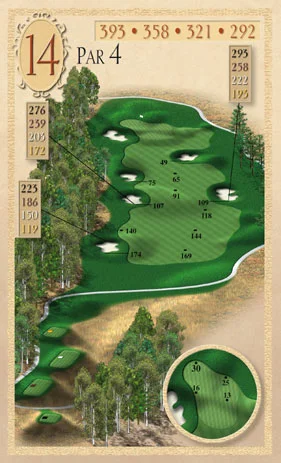
No tricks, no traps—just a fair test. This straightaway par 4 rewards confident swings and simple strategy. The fairway is generous, so take aim and let it fly. A well-placed drive leaves a short to mid-iron into a receptive green, giving you one of the day’s better birdie looks.
Sometimes, less is more. Execute cleanly, and this one plays just the way it looks.
HOLE 15
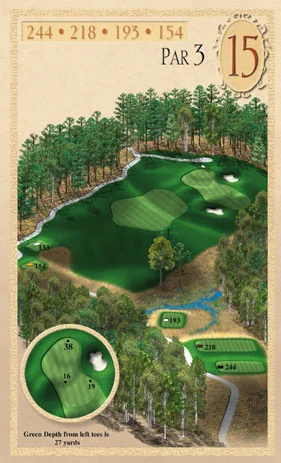
The Illusionist
From the back tees, this hole feels more like a par 4 in disguise. Long, visually intimidating, and absolutely deserving of its status as the toughest par 3 on the back. But looks can be deceiving.
The green is bigger than it appears from the tee, but framed by natural slopes and hazards that mess with depth perception. It’s a hole that plays mind games, demanding full trust in your yardage and your swing. Players from the forward tees will enjoy a far friendlier view—but for those taking it on from deep, par is a moment worth celebrating.
HOLE 16
Slipstream
This well-crafted par 4 rewards execution from tee to green. A confident drive over the fairway bunker complex opens up the ideal angle for your approach—and trust us, that angle matters.
The green sits below you, inviting a soft, controlled shot. Play it short and slightly left, and the slope may do you a favor, funneling the ball toward the pin. But miss the moment, and recovery gets complicated fast. This hole is all about position, pace, and letting the design work in your favor.

HOLE 17
Shadow of the Valley
This long par 4 plays like a tale of two shots. Off the tee, you’ll launch downhill into a blind valley—just trust the aiming post and don’t stray, as sandy waste areas guard both sides. The landing zone can’t be seen, but it demands your respect.
From there, it’s all uphill. Your approach must carry elevation into a green that’s deceptively simple, yet punishing to those who misjudge the slope or distance. Accuracy is everything. The penultimate challenge rewards players who stay committed—and penalizes those who don’t.

HOLE 18
Endgame
Few finishing holes rival the beauty and balance of Brickshire’s final chapter. From the elevated tee, the panoramic view reveals both your path—and your test. A straight or gently drawn drive sets you up for a choice: take the safe route up the left fairway, or aim for the bold, narrow landing area beyond the bunkers on the right.
The green awaits on a peninsula, guarded fiercely by water and sand. An approach just short disappears into bunkers. Long, and you’re fishing. The green is generous, but the margin for error is razor-thin.
It’s a hole that tempts, tests, and humbles—and a fitting end to a course built on bold design and quiet brilliance. Birdie dreams live here. So do doubles.

